Showing posts with label jawbone. Show all posts

Thursday, November 6, 2014

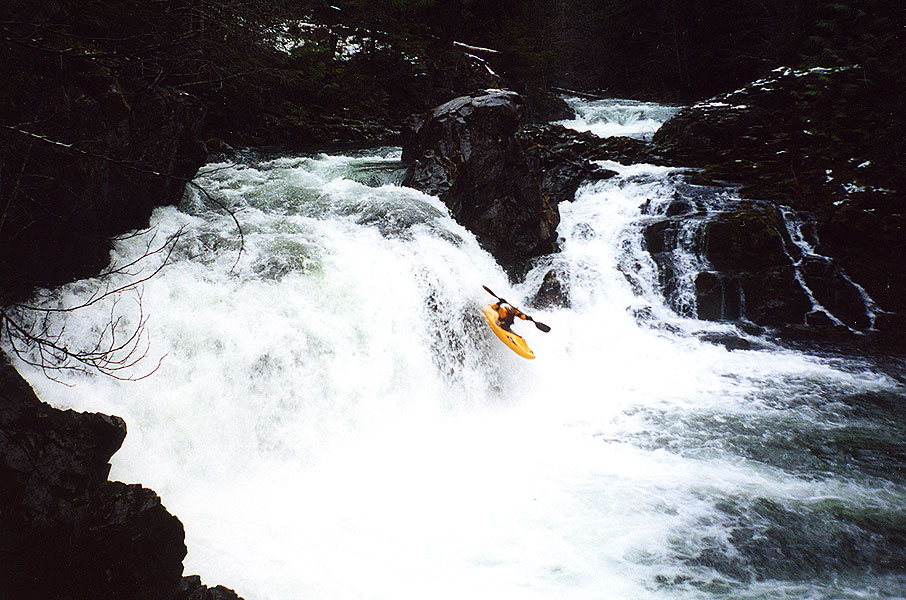
Opal Proper

Photo: Pete Giordano


BETA

Stream: The put in is a little over 1 mile upstream of Jawbone Flats.  The standout rapids on this run are all bedrock.  Most of them are runnable, while some of them are not, while nearly all are unique.  There are some short waterfalls, slides, ramps, chutes and pockets.  Scout each rapid carefully, fortunately it is usually obvious straight away whether you are looking at a fun rapid or a portage.

Part of the fun of this run is figuring it out like a puzzle.  There are a few portages (all easiest on the left) mixed in with fun and unique bedrock rapids that are sure to leave you smiling.  Scout everything your first time down, and don't go around any corners without knowing where your next eddy is.

The competency crux of the run is the final portage.  There is a ten foot falls that splits around an island with most of the current going left and a semi-scenic tributary coming in on river right.

                                                       The aforementioned Flume Creek Falls

If you have made it this far, I am sure you will recognize this as an unsafe drop as the landing zone appears to be exploding.  Head up to the trail on river left and instead of returning to the creek as early as possible, continue walking down to a foot bridge (don't drop back to the creek earlier that that bridge).  Put back in wherever you feel comfortable finding your way down below this bridge.

Shortly below here you will reach the confluence with Battle Axe and your trip down Opal Proper will be over.

If you did not get an early start, hiked slow, had carnage or fiddled around you will be noticing that the light is starting to fade.  If that is the case, start looking for the road on river right to hike out on.  You can continue all the way to Cascadios De Los Ninos before being committed to running the entirety of the Upper Opal section of the Little North Santiam.  

If you were efficient with your time, you can look forward to more boating.  The most obvious choice is to continue down through Upper Opal to the Mine at the Classic Opal put in, where a short uphill hike along the road will return you to the gate where you began your hike that morning.   Though if you were moving really quickly you may have time to go further if you set shuttle beforehand. 


Flows:  1,000 cfs is bare bones on the Little North Santiam @ Mehama gauge, 1500 cfs is the level shown in the video below and was a friendly, enjoyable level.  No idea what the upper limit would be, I wouldn't hesitate to head up there with 3,000 cfs and dropping though.

Access:  Take I5 to Salem and head East on Hwy 22.  In about 22 miles turn left at a flashing yellow light onto N Fork Rd.  In about 15 miles the road turns to gravel, and at 21 miles you will reach a gate where you leave the vehicles, a location that has a $5 fee to park.  


**If you know you are an efficient boater and think you will have time to do both Upper and Classic Opal after Opal Proper you can leave a vehicle at Three Pools to rid yourself of any hiking at the end of the day**

From the gate, get your gear carrying devices out and head past the locked gate up the gravel road about 3 miles to Jawbone Flat along a nice gravel road.  This is a perfect use of the kayak wheels. After reaching Jawbone, head to the back of town and over Battle Axe Creek.  Veer right just after the Pelton Shed, passing through an open area with a gravel pit.  Just passed this open area will be a sign for "Opal Pool", if you like drop your boats here for a moment and hike down to scout the nasty rapid that lands in Opal Pool.  It is worth checking out the situation above this drop so you don't accidentally get blown into it.


Return to your boats and continue along the path, shortly the path will make a sharp bend to the left and a small trail will head off to the right; take this trail to the right.  Follow the trail for a little over 1 mile, at about this point you will see nothing but bouldery class II above you and it is time to put in.  

               Looking upstream, then downstream from the put in.  On the downstream end of Cedar Flats.


 Map of the area
click to enlarge


----------------------------------------------------------------------------------------------------------------------------------------------
Original Write-up
----------------------------------------------------------------------------------------------------------------------------------------------


I realized a funny thing a couple years ago.  This being that I had many times planned, joined and executed kayak trips to "Opal Creek" in the North Santiam drainage without having ever run Opal Creek itself.  This was not due to debacles, in fact, those trips were all fun and usually smooth.  This is because I had never intended to put on to the actual Opal Creek in the first place.  From the confluence of Battle Axe Creek and Opal Creek near Jawbone, the stream the boating community usually refer to as Opal Creek is actually called the Little North Santiam.  I had read the Oregonkayaking trip report and decided I would one day try to head up and boat the actual Opal Creek.

---------------------------------------------------------------------------------

I went up to check out Opal Creek proper (above Jawbone Flat) fall 2014 armed with beta collected from the report on Oregonkayaking.  I was hoping that making my trip early in the year before the snow hit would give me a more positive outlook on the stream.

Video from the trip.

There have been a few changes since the OK trip occurred, here are the changes I noted


  • There is a new trail up creek right (OK travelled on creek left) that was not difficult.  I would not be excited about trying it in the snow though. To find this trail, locate the signs in Jawbone Flats to Opal Pool.  Once you scout the Narrows, return to the old road/Kopetski trail and follow until a sign for the Kopetski trail takes off to the right.  Follow this to wherever you decide to put in. 


  • The log bridge mentioned in the OK TR is gone now


  • The logs at the lip of Log Leap Falls are gone.  It is still a dubious drop that I did not run, but with safety and the right group it may go.


  • Because I had read the OK TR I knew what to expect on the run, this allowed me to not have to hike out from Cascadios Los Ninos at the end of the day.  Even with a late start I had plenty of time to paddle down to the Mine.  If I were to repeat this run and had a shuttle, I would try to get an early start with the idea to take out at Salmon Falls for a nice long day of boating.

--------------------------------------------------------------------------

Other notes


  • I had 1500 cfs, same as oregonkayaking, but without the snow I ended up having a little more water.   This was a good level and I would think 1500 would be the ideal level to do Opal through Salmon Falls.


  • The Narrows into Opal Pool addressed in the OK TR is just as menacing as they claim, it appears that it would be very easy to boat scout past the last eddy here.  If you portage Log Leap on the river left trail, keep walking until past this section.  If you run Log Leap, take out as soon as you can egress up the left bank through the brush.  Or better yet, make a plan as you hike upstream at the beginning of the day.


  • The rapid described as just below the log bridge is just as fun as noted!  Great rapid.  Quote from Jason “This is one of the most entertaining drops I have run in a long time; if we hadn't been so concerned with time I would have hiked up to run it again and again!“


  • There were a handful of portages, I did all of these on the left.  If you are creative, none of them are strenuous (without snow).


  • I used a wheel system to get my boat to Jawbone, this helped a lot.


  • It took me 5 hours car to car.


  • The scenery is classic upper LNF drainage and there are enough unique, fun rapids to make this trip worth doing.  I won't be hiking all the way up there every time I am in the area, but I wouldn't say no to a return trip in the future, near or far.


  • I agree with OK that Battle Axe has more runnable whitewater, but the best/most unique rapids are on Opal.  If I were to have a rule of thumb about the area above Jawbone, I would say one Opal trip to two Battle Axe trips sounds about right.


If you are the kind of person who enjoys this type of run, that should be more than enough info.  Go when there is no snow and enjoy!  


               -jacob

Thursday, November 4, 2010

Battle Axe Creek: Lite

Photo: Priscilla Macy


BETA


Stream: I have used both the put in described here and the lower put in described below. If you make it to the top, you do get some extra rapids that are fun.  However, the hike is longer and generally all uphill, while the lower trail is shorter with less uphill.  While I felt it was worth doing the longer hike for the upper part once, I will use the lower put in for any future trips where the bang for buck ratio is higher. 

After the 3 mile hike to Jawbone (these work like a charm), shoulder your boat, cross over Battle Axe Creek and check flows. 

 Looking upstream from the bridge at the very minimum of runnable flows.
While the snow looks pretty in photographs, its not preferable on the water or the hike.


The Battle Axe bridge in Jawbone is a good place to take a short break, check the level, and switch from wheels to shoulders.  We were able to drag on this trip due to the snow.

Keep hiking (route described in the info section) past the bridge to the faintly marked Whetstone trail and veer left.  This leads to the creek at the lower put-in, in less than a mile (downstream of S.O.B.). 

The creek consists of many 5-10+ foot bedrock rapids with logs sprinkled throughout.  You can expect a few easy log portages, but mostly they can be dodged.   

Even at very low flows there are some fun ledges.


This drop is the largest and means you are close to the end, it can be run left-of-center or right (I like left-of-center).


That's about all there is to say, no unusual hazards, no class V, just fun rapids with some logs.  If there wasn't a hike it would be done all the time.  If you didn't get an early enough start hike back out from Jawbone the way you came in, or continue to Cascadios de los Ninos/Sawmill Falls.  If you built in enough time to continue through Upper Opal, I would recommend that.  Or if you are really efficient you can paddle down to Three Pools or tack on Opal Proper.


                                              Battle Axe through Salmon Falls @ 1,100 cfs
Double this flow is better, but if you have a rock boat, Prijon or ZET plastic it can still be worth checking out at these flows if you want something new added to an Opal trip.


The Battle from Difficult E on Vimeo.


Flows:  2,000 cfs on the Little North Santiam gauge is minimum enjoyable.  All the rapids are well channelized.  3,000 cfs is a healthy medium and the upper limit has not been found.  In the Spring when there is a snowmelt component it can be run all the way down to 1,000 cfs if your kayak has strong plastic.


VISUAL CHECK
Looking at the ledge below the Battle Axe Bridge in Jawbone.

  • If the blue line is the only runnable line (like in this photo) you have low water.
  • If you could feasibly paddle the route indicated by the orange line, water is medium.
  • If the orange line looks padded out, you might be in for an exciting day.


Medium/High flows, I wouldn't want much if any more on a first trip down. Snagged from this video of the last 1/4 mile of the creek.


Access:  Take I5 to Salem and head East on Hwy 22.  In about 22 miles turn left at a flashing yellow light onto N Fork Rd.  In about 15 miles the road turns to gravel, and at 21 miles you will reach a gate where you leave the vehicles, a location that has a $5 fee to park.  

Get your gear carrying devices out and head past the locked gate up the gravel road about 3 miles to Jawbone Flat along a nice gravel road.  Then cross over Battle Axe and continue upstream along the road next to Battle Axe until a trail heads off to the left (marked as Whetstone in 2017) that leads down to the put in a mile or two above Jawbone.  Or continue to the upper put in.


Notes: Do some research to make sure there isn't snow above Jawbone, hiking/paddling in the snow isn't a whole lot of fun, and might make for lower flows than expected if some of the water is locked up in its solid state.  TRIP CHECK is a good resource.


----------------------------------------------------------------------------------------------------------------------------------------------
Trip Report
----------------------------------------------------------------------------------------------------------------------------------------------


Battle Axe Creek: Lite

2010:  Nate checking in from the land of Funemployment.
I woke up Tuesday morning with tentative plans to go kayaking. Matt and I had planned to get up leisurely, check levels, and maybe tackle something close to Portland. I finally pulled myself out of bed around 8 o’clock and got on USGS to find that EVERYTHING was in. Overnight, the Little North Santiam @ Mehama had gone from somewhere just below 1000cfs all the way up to 2700... and rising. The first thing that came to mind was Battle Axe creek, a small trib high up in the Little North Santiam drainage. The creek is described on Oregonkayaking as having all the elements of a 'classic creekin run'. With amazing geology, great scenery, and lots of waterfalls, battle axe has been on the top of our list for a long time. However, there are two issues that keep this creek from being run all the time. 1. You need lots of water! At least 2500cfs in the LNS gauge. 2. Access is a bit of a nightmare. From the parking area where you begin your hike into the normal Lower Opal creek run, it is over 3 miles to reach Jaw Bone Flat, the take out for Battle Axe. From there, it is another two miles of hiking up the creek to 3369 trail crossing, which was the put-in used by the oregonkayaking crew a few years back. Needless to say, this creek is an all day affair.
Back to the story. Having woken up at 8, Matt and I were not able to get on the road until 9, which would seem to be far to late into the day to attempt such a time consuming mission. As I mentioned, this run has been on our radar for some time now, so much so that Matt had already devised a plan to get us into Jaw Bone with far less time and effort than the standard hike. At 11 am sharp, we rolled into the Opal Creek trail head and unloaded our boats, our gear, and the bike cart! Within a few minutes we had the two kayaks loaded onto the cart, along with all our gear, and we were peddling up the dirt road toward Jaw Bone. (this particular cart is rated up to 300lbs) We must of looked like some sort of circus act as we headed up the road, being that Matt was towing the cart on a single speed bike, every once in awhile I would have to jump off my bike and push from the back to ascend particularly steep sections. The cart did tip over once or twice, but it held up nicely and we rolled into Jaw Bone (the take out) within 30 minutes of leaving the car.
Here is where things started to go a little south. As we waited for Caitlin, who had come along to enjoy the beautiful day in the woods (did I mention we had gorgeous weather?), we started chatting with the live-in care-takers of JB. They were all very nice and we had a good time talking with them about their life style up in the woods, however, we did get one piece of bad advice, which we followed. They recommended that rather than follow the trail right up the creek, we should continue on the road, which would eventually meet back up with the trail and was not nearly as steep. We decided to go along with this plan thinking that we could continue to bike all the way to the put-in, rather than shouldering our boats. After tackling a few steep switch backs, we were making good time up the valley with the creek far below us slowly rising up to the meet the road.
After we had gone a considerable distance we found a substantial trail coming up from the creek and intersecting our road. After some discussion, we decided that we had made it to the crossing and our intended put-in... but the intersecting trail didn't seem to have any access towards the river and was actually trending back down towards JB. At this point, we decided to just drop into the creek through the woods and put on, our rationale being that if anything, we were above the put-in used by the Oregon Kayaking crew. As we put on, two drops were visible upstream, each about 10-15 ft tall. One had wood in the base, the other was clean. It would have been a terrible bush-wack to get above these drops with our boats, so we kept with the plan and put on. At this point we actually thought we might be dropping in above the nasty upper section described on oregonkayaking.
Within 100 yards we came to sizable ledge drop leading into another ledge that appeared to be pretty sticky. A quick scout revealed a fun twisting drop with a retentive hole near the bottom. The drop went well and was free of wood. We actually had no wood portages on our entire run. After a few more ledges we came to a big horizon line that was creating a truly amazing vista. The drop consisted of 3 ft. ledge that fed right into an 15-18 ft. water fall. This drop is called Battle ax falls and was run on the far right by the oregonkayaking crew due to wood in the center of the drop. The drop was clean as whistle on this particular day and the center line was the preferred choice. A sloping 5 ft slide into a flake! Great drop.
The only bummer about running Battle Ax falls was the realization that we had dropped into the creek too soon and had missed a significant amount of the gradient. Taking the lower grade road turned out to be a huge mistake and resulted in a longer walk and less paddling . If you do this run, just follow the normal trail right up next to the creek, it isn't very steep and is well maintained.
After this realization, we made the call to continue down to Cascada de los Ninos on the Little North Santiam to get some extra paddling in. We bombed down what remained of Battle Axe enjoying the numerous ledge drops and the final falls below the bridge at Jaw Bone before hitting the confluence. 10 minutes saw us at the lip of Cascada. Matt took a quick peak, which was pretty difficult to do given the high water and signaled me over the drop. He followed shortly after and we took off the river feeling a little bitter sweet about our experience on Battle Axe. Given the ease at which we had attained the creek, we didn't feel too dejected about the drops we missed, but it was still a bummer to have come so far to boat so little. We'll know next time. Despite our folly, a great day was had by all. The creek is excellent and I encourage everyone to get up there and see for themselves, just be sure to put on at the proper spot.
After ditching our boats, we walked back up to Jaw Bone to meet Caitlin, who had been so kind as to ride the bike trailer down the hill for us. After a few games of horse shoes and exploring the old mining village, we were on our way back down the hill. After a quick stop to load up the boats we arrived at my car and were on our way home.
Thanks go out to Caitlin for helping with the bike cart and to those who found this gem and made it known to the world.
Until next time.
Nate

Sunday, May 4, 2008

Little North Santiam: Upper Opal

Photo: Priscilla Macy


BETA

Stream: Upper Opal is similar to the Classic run, but a little more serious and involves a hike instead of a walk to the put in.  The full run begins in Jawbone Flats, though sometimes people get tired of carrying their boat and put in at Sawmill Falls/Cascadios Los Ninos.

It's worth making the push up to Jawbone at least once, if just to check out out the town.  At the confluence of Battle Axe Creek and Opal Creek Proper (visible from Jawbone), the Little North Santiam River is formed and this is the beginning of the Upper Opal run.  There is some easy floating up here as the stream carves through one of the most beautiful portions of Oregon.  The whitewater quickly picks up and one seven foot horizon line (worth a look on your hike up) presents a fun slide.   

Less than 1/4 mile after passing under a bridge, the horizon line at Sawmill Falls/Cascadios De Los Ninos presents itself.  Most people scout on the left where there is an easy walking route if you wish to portage or do laps.  At first glance this appears to be a straight forward falls, and at medium levels and up it is.  However as levels drop you start to realize there are shallow spots all over the place on this falls so scout carefully.  Far right and far left are the worst.  The higher the level the less likely one is to land on a rock.

Alan Bergman right on target.  If flows are much below 1,100 cfs, there is a real chance of landing on a rock (under the veil in the photo) here too.  The boof flake marked by the orange arrow is good to go at all flows, though lining it up can be tricky so again, scout this drop thoroughly at all levels.


The whitewater picks up below Sawmill/Cascadios De Los Ninos though it never reaches true class V at the recommended levels.  At high flows there may be a couple rapids you would be forced to run blind that the typical Opal Creek boater would rather portage, so I'd stick with between 700-2,000 cfs unless you know the run well.

Below Sawmill/Cascadios De Los Ninos there is some scenic floating.  When things pick back up there will be some read and run and then a blind rapid with some large boulders that can be scouted and run on the left (second photo in this report).

The very next rapid is the nearly must-run Harvey Wallbanger.  Eddy out along the left bank (entering the island on the right side will dictate running the rapid blind) and walk downstream to take a peak for wood.  

                                       Looking down into Harvey Wallbanger from the scout.


There are no big moves in Harvey Wallbanger, just stay right and keep your boat pointed downstream.  There are two soft holes in the narrow bottom portion of the rapid, but I have never seen them give anyone trouble.

Jesse Shapiro lining up the two narrow holes.
                                                              Photo: Lucas Rietmann

Most people catch an eddy on the left just below these two holes and before the exit move.  For the exit move paddlers build up as much speed as can be mustered and ride a strong left stroke through a plucky hole into an alleyway.  It is possible to set safety here on the left side.  There is a large pool below in the event of a swim though for what it is worth, I have never seen anyone have trouble here.

                                                                  Ross George pulls through.
                                                                                Photo: Lucas Rietmann


The river gorges up again a short ways downstream for another fun rapid, both channels are fun, I try to stay off the far left wall though.   A short ramp below leads out of the gorge and attentive boaters will soon notice road abutments high on the right and get ready for Coyle's Boil.  The stream builds from class II-III along a river-right boulder bar here, as it turns back to the right there is a steep III+ rapid leading right into Coyle's Boil (portaged more often than not).  You must catch one of the eddies at the base of the III+ before going over the short drop that is Coyle's Boil.  People generally catch the river right one, then ferry over to river left to portage.

Eric Adsit ferries from river right to river left just above Coyle's Boil, with the III+ rapid visible just upstream.
Photo: Priscilla Macy


The line at Coyle's Boil.  
This one gets more runnable as levels increase above 1,000 cfs.
                                                                                  Photo: Priscilla Macy


The portage is short and easy on the left.  If you are the curious type, check out the mine shaft on river left.  You can make your way some distance back there.
                                                                                 Photo: Lucas Rietmann


There is a ledge just below Coyle's Boil that looks like it has a sweet boof on the right, do not take that line as it lands on a rock with face-rearranging capabilities.  Instead run center-right or center-left, it's worth a quick scout for the smoothest line if you don't have a guide.

A hundred yards of easy water lead to the final ledge.  If levels are up I recommend scraping down the shallow right side of the ledge.  If levels are lower check out the left side "Hypoxia Hole".

Take out in the pool below this ledge on the right and walk the road back up to the gate, or continue through Classic Opal.  Ambitious boaters with an early start sometimes try for Total Opal (Jawbone through Salmon Falls) by tacking on Opal Gorge.


Flows:  If you are showing yourself down this run without a guide for the first time my recommendation is 800-2,000 cfs in the Little North Santiam at Mehama.

5.3 on the Elkhorn Gauge is my low-end cutoff for Upper Opal.

Access:  Take I5 to Salem and head East on Hwy 22.  In about 22 miles turn left at a flashing yellow light onto N Fork Rd.  In about 15 miles the road turns to gravel, and at 21 miles you will reach a gate where you leave the vehicles, a location that has a $5 fee to park.  You will walk back to the this gate at the end of the day if you are only doing Upper Opal (this is rare, most people continue through Classic Opal).


If you are continuing through Classic Opal or Opal Gorge, refer to those pages for other take out options. 

To get to the put in from the gate, carry your boat past the locked gate up the gravel road about 3 miles to Jawbone Flat along a nice gravel road.  Put in wherever is clever in town, I usually choose to put in at the bridge over Battle Axe Creek.

Some people who tire of carrying their boat put in at Sawmill Falls/Cascadios De Los Ninos, which is an obvious feature about 2 miles into the hike.