Showing posts sorted by date for query cispus. Sort by relevance Show all posts

Thursday, January 17, 2019

Calculating Stream Gradient (quickly)


When you are paddling outside of a guidebook, one of the key attributes of a stream to ascertain is the gradient.  While it won't tell you exactly what you are in for, it can give you a clue, especially if compared to the gradient of similar sized streams in the area.

Iv'e been asked what tools I use to do this more than once, so decided to create a short tutorial for the quickest way I know how.  The math is simple and while the whole process can be done with a paper map and a string, I find this method faster.

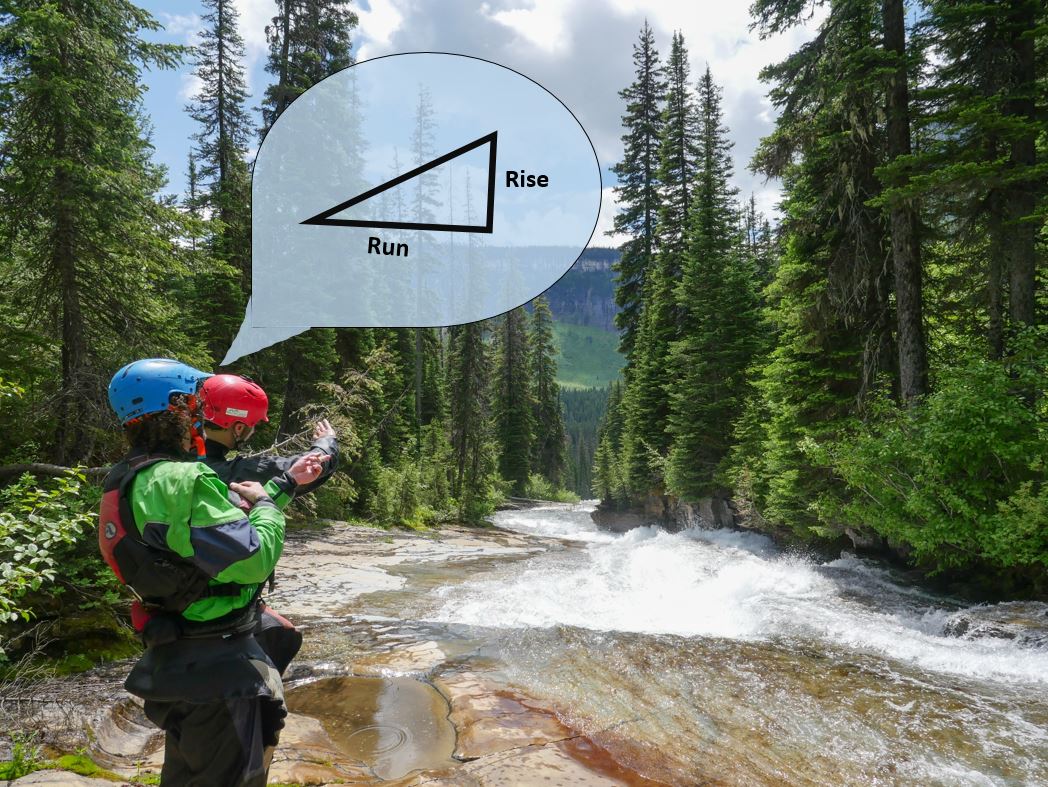
If you want background knowledge in rise/run and the math, click here.  Kayakers think in elevation lost, so on this page I will use the word "drop" in place of "rise".  They are the same, and simply represent the change in elevation.

The simple of it is you want the elevation dropped (in feet) divided by the distance traveled (in miles). 


The next step is to find elevation lost and the distance traveled on a stream. Here’s how to do it:


1) I start by going to Hillmap.com    I find it to be a simple and effective tool for this job.

2) I put the program in "terrain mode", using the drop down menu and clicking the terrain option button like shown below.  This creates a hillshade effect over-layed with contour lines once zoomed in.


3) I locate the section I am interested in and zoom into it.  For this tutorial, I'll be analyzing a section of Cavitt Creek between it's confluence with Plusfour Creek (43.147, -122.9556) and a bridge just under 4 miles downstream (43.1569, -123.0167).


BEFORE CONTINUING, MAKE SURE YOU UNDERSTAND HOW TO READ A CONTOUR MAP.


4) I find an index line near where I want to start calculating gradient.  Then trace the stream using the "path" tool to a contour line down near the end of the section I am interested in.  In Hillmap, just click on "Paths" then click on the map and it will start drawing.


  • You can see that once the path is traced, the distance of the path shows up in the top center of the screen. 3.67 miles in this case.   

  • I know the distance between 2 index lines at this scale is 200' (they are written on the index lines themselves) and 5 contour lines are counted before the next index line is reached so I can ascertain that each contour line is 40 feet (200/5=40).  Note that if you zoom out enough this changes to 400' between index lines, so be aware of which scale you are at.

  • In this case I passed two index lines and two more contour intervals, and the scale was such that the index lines were 200' apart.  This means the total elevation dropped was 480'.  
 
  • With a drop of 480' and the distance traveled being 3.67 miles, I plug those into the equation as 480'/3.67 miles which rounds to 131'/1 mi or to put it in the form kayakers are used to..........131 fpm

And that's how you calculate the gradient of a stream.


TIP:  If you flip the basemap to satellite mode and zoom in, you will be able to trace the stream more accurately, before flipping it back to terrain mode to count the contour lines.  


-------------------------------------------------------------------------------------------------
More
-------------------------------------------------------------------------------------------------


For kayakers, there is more to it than that.  131 fpm is the overall gradient, yet the most important figure for me to determine on an exploratory run is the maximum gradient.  That will answer the question of what is the steepest section of stream we will encounter?  Where is the biggest challenge most likely to occur and how big of a challenge might we be talking?

For that, I look for the two closest index lines on the map.  When you have done this enough times, that is easy to eyeball.  If you are just starting out you might need to guess and check a bit.

 For Cavitt Creek, the two closest index lines would be between...

Then I draw the path between those two index lines, and come up with a distance of 0.88 miles.


Since I know those index lines show 200' of elevation difference the calculation is 200/0.88 which equates to 227 fpm.  I find this number more important than the overall gradient.

You can get much more in-depth than this, many guidebooks even list gradients mile by mile, but you can make the call about how much information you need.  The gradient can be combined with other tools like satellite imagery, flow charts, hiking photos of the stream, fishing forums, scouting trips, rumors from a friend of a friend and anything else you can get a hold of to paint a picture of what you might find on a stream to help you make a decision if its something you want to explore with a kayak.


*Astute observes will notice that when tracing a path in Hillmap, that next to the distance traveled is the ft gained and ft lost. I don't find the elevation lossed/gained to be represented accurately by Hillmap when tracing a stream so choose to count the contours myself.


-------------------------------------------------------------------------------------------
Story
------------------------------------------------------------------------------------------- 


The advantages of knowing the gradient on a new stream to explore can be obvious. From 600 fpm, holy cow that's nuts!  To 13 fpm, hmm maybe I'll save that one for teaching grandma how to kayak.

A good case study on the usefulness of being able to obtain gradient information was when planning for a southern Oregon tributary to the Illinois River called Lawson Creek.  Typically I want to put in as high as possible on a new stream for the first time to see as much of it as I can.  Then afterwords can find a put in/take options that gives me the best bang for the buck (if it's even worth repeating the stream in the first place, often it's not).

For Lawson Creek, the stream looked pretty uniform from the satellite imagery, boulder strewn with some tantalizing bedrock at the very top.  When I went to calculate gradient, I noted the upper reaches were mostly reasonable, but had some pretty high gradient sections around 300 fpm.  Now gradients over 300 fpm can be good fun, but only in rare cases is it not at least class V once you get past the 250 fpm mark in Oregon.

 Boulder Creek is an exception to the rule.
300 fpm and never reaches class V.


Most often though that kind of steepness ends up being extra dangerous and partially to fully unrunnable in the PNW, especially when it is bouldery like was obvious Lawson Creek was from the satellite imagery.  Downstream of the 300 fpm section there were a couple more reasonable miles then the gradient soured to over 450 fpm for a short bit.   However, I noted that just downstream of that gradient spike, the stream eased off to 100-150 fpm for the last couple miles, which seemed just about right for us to roll the dice on an adventure given the size and style of stream that Lawson is.

The area is rugged, so just bushwacking in below the gradient wasn't a great option, so I looked at a different basemap (CalTopoFS) that includes trails, and found one!  I rechecked the gradient starting at the trail going both upstream and downstream, and saw that it was placed in a pretty ideal location just downstream of the last Richter high section of gradient.  


This trail ended up having a lower elevation access road than dropping in from the top so snow wouldn't be as large a concern and meant we could do the run as a day trip, and weren't as worried about dealing with long class V and unrunnable sections and could expect more of a IV-IV+ (V) trip which is more our style.  You still never know what you will get on those type of runs until you go, but in this case we set ourselves up to have the best chance we could of having a good adventure and it paid off with one of our favorite days of boating that year.  On the hike in, we had high visibility both upstream and downstream and could see that we were in fact putting in just below a section of very steep whitewater, and just above what turned out to be a couple miles of fantastic IV-IV+ boulder gardens.


    -jacob


A comparison in Gradients


 400 fpm and bouldery in Oregon


450 fpm bedrock in Montana


 600 fpm polished granite in California


Some known entities in this area and their gradients (rounded).


Rogue.................................................13 fpm
Illinois................................................24 fpm
Clackamas (Three Lynx)....................30 fpm
North Umpqua....................................30 fpm 
Wilson................................................35 fpm
Crooked..............................................40 fpm
Bull Run.............................................50 fpm 
Breitenbush........................................60 fpm
Grays..................................................65 fpm
White Salmon
     Farmlands......................................60 fpm
     Truss..............................................130 fpm (174 max)
     Middle...........................................50 fpm
     Lower............................................30 fpm
     Lower Lower.................................50 fpm
Upper Wind........................................90 fpm
Blue....................................................90 fpm
Little North Santiam (Opal Creek).....100 fpm
Quartzville Creek (Upper)..................100 fpm 
EF Lewis.............................................110 fpm
Canyon Creek, WA.............................120 fpm
Copper Creek......................................125 fpm 
Lower Trout........................................125 fpm
Ohanapecosh.......................................130 fpm
Cispus (Upper, Upper)........................150 fpm
Canyon Creek, OR............................. 90 fpm (200 max)
NF Clackamas....................................200 fpm 
Lake Creek Slides..............................200 fpm
Mccoy Creek......................................200 fpm
Brice (Upper).....................................215 fpm
Brice (Lower).....................................60 fpm
SF Coquille (The Gem)......................220 fpm
Clear Fork Cowlitz.............................230 fpm
Miracle Mile.......................................250 fpm  
Little White Salmon...........................250 fpm (295 max/Gettin' Busy)
Lostine................................................250 fpm
Hagen.................................................260 fpm
Upper Trout........................................260 fpm 
Christy Creek.....................................400 fpm in steepest mile


It's a whole different game in California's High Sierra's, where 300 fpm wouldn't even get you an honorable mention.


Thursday, August 3, 2017

Cispus: Super Slides


Photos:  Priscilla Macy

BETA


More beta for this run can be found here, and here.

Stream: If you put in on Goat Creek with a similar configuration of trees as we found in 2017, you will find a small stream with numerous portages around logs and some loose boating.  If you put in on the Cispus, you might have a quick portage or two before the slides start.  Of the two approaches, I preferred the second.  It requires about 30 minutes of downhill walking through open forest, the classic Northwest forest allowed for easy dragging.

Once you reach the Cispus, the stream is consolidated and there are a couple class III-IV rapids before the first horizon line which can be easily scouted on the right.  From this point to a point less than 1/4 mile above Walupt Creek Falls the stream is continuous slides.  All fun, all straight forward.


The trick is finding eddies, when there is enough water for the run to be fun, you need to scout eddy to eddy which can take a fair bit of time/effort.  The first lap took us 4-5 hours, the second lap (once we knew the run) took us less than 15 minutes.  

The scouting and eddy situation starts out friendly once on the Cispus and slowly works its way towards tricky as the slides bend around sharper corners.  Nannie Creek enters the Cispus over the below pictured waterfall.  This falls is a good indicator of having reached the finale, the rapid above it is the first corner that requires creativity to scout.

The river bends right below the Nannie Creek confluence (last easy eddy), back to the left and then drops away steeply into the finale.  Once past the horizon line, paddlers are committed to nearly 1/2 mile of continuous slides.  It took about an hour to scout the first time high on river right, which we were able to do thanks to Adam making a dicey eddy and pulling us in out of the slide one at a time.  Once at Nannie Creek Falls, don't leave any eddies until you know how to get into the next one, or are comfortable committing to the next half mile of slides.  The second trip we knew it was clear so didn't scout and it took just a couple minutes to run.  The line for us was to stay center, justified to the inside of any corners.  

                            The steepest part of the final 1/4 mile, from Adam Edward's perspective.


This final 1/2 mile rapid below Nannie Creek ranks up there with one of my favorite rapids of all time, I felt the effort of the run was totally justified by the largest scale class III-IV rapid Iv'e ever run.  Giggles all around.  The whitewater soon peters out and then ends where Walupt Creek falls enters on the left.  There was a surf wave and rocky beach here, making for a nice lunch stop.


After taking in Walupt Creek Falls, it's time to head downstream.  If you are taking the trail out (a little under 1/2 mile downstream of Walupt Creek), keep an eye on river left.  After passing the second notable rockslide, there will be a 30 foot high cliff on river left visible downstream.  Eddy out just below the cliff on river left.  Walk up to the bench 10 feet above river level, you should see another rockslide at this point.  Parallel the river along the bench until you come across a trail, follow this trail up to the vehicles.

If you are using the bridge take out, you will enter the swamp a short distance below the final rockslide.  Downstream progress will become difficult for 1/4 mile as you portage through the swamp.  The river re-consolidates a short distance above the bridge.


Flows:  We ran this twice in June 2017, The Cispus was flowing from snowmelt with bumps from significant rain.  June 16 was a fun, friendly flow.  June 18 was a little lower, but still worth it.  Word is 3,000 is medium, give or take 1,000 cfs to get the range of low to high, 500 cfs or more than that in either direction are pushing into the distant edges of runnable.  Eddies are the limiting factor on this run, they were scarce at low flows.  So if you knew the run and that it was clear of wood, you might be able to push the flow levels up a bit if you were willing to forgo scouting.


Access:  The standard route into the area (NF-23 out of Randle) was not passable due to the road being washed out by the Cispus River near Blue Lake.  We took NF-21 paralleling Johnson Creek (which looked like it was at a friendly flow).  For that route, leaving Hwy 12, take NF-21 16 miles and turn left toward Walupt Lake.  Cross the Cispus 1.5 miles later.  This would be the preferred take out, except there is a 1/4 mile long portage through a swamp if you choose that route.  We chose to continue another 1.7 miles to a trailhead, where you can hike about 3/4 of a mile uphill at the end of the day to avoid the portage.

Bridge Take Out:  46.4146, -121.5244
Trail Take Out:  46.4234, -121.5011

To get to the put in return to the bridge across the Cispus and head back towards NF-21.  If you have a high clearance vehicle you may choose to take a short cut shortly before reaching NF-21 on NF-2152.  If you have a Subaru, continue to NF-21 and turn right.  There is a map below that lines it out, but here are the step by step directions as well


 Continue 2.9 miles and turn right again on NF-2150 (the road becomes unmanaged).  Another 1 mile and turn right onto NF-2152, and in another 0.6 miles left onto NF-016 (the road can be rough).  In 0.9 miles there will be a spur road going off to the left (don't take it), in another hundred yards you will notice a small marshy-pond to the left, park here.  Follow the rivulet leaving the marshy-pond down to the Cispus, the distance is under 1 mile.  You will know you are close when you reach a second marshy-pond area.


                                                                    NF-016


If you want to put in on Goat Creek, just continue past the marshy-pond to the end of the road.  Goat Creek is visible from there.  

Hike in to the Cispus:  46.4494, -121.5144
Walk in to Goat Creek: 46.4585, -121.5102


Paddlers:  Adam Edwards, Whitney Butler, Brandon Lake, Priscilla Macy, Jacob Cruser

Tuesday, August 16, 2016

Why we go

After a rough start to the summer, watching Nick have a stellar trip down his hardest run to date reminded me about one of the reasons I kayak.

Nick was leaning towards walking out at Island, a broken paddle during a scout made that an easy choice to take had he been looking for an excuse.  However, he decided finishing the run was something he wanted to do and committed to paddling to the lip of Behemoth, a point from which there is not a reasonable option of turning back.

The risk in kayaking can be hard to justify, most often to those who don't do it, though sometimes even to yourself.  As anyone who has ever stepped up their game in a setting like that at Behemoth knows, you can be one person at the top of a rapid, and a slightly different one at the bottom.  

Here is a video of Nick expanding his horizons by means of descending one.

*So understated he got left out of the credits, Ben Mckenzie deserves a shout out for his role on this trip and many others.

Also on this trip was a friend of ours who was helicopter lifted out of the area last year when he broke his leg at Island Rapid.  He succeeded in descending the canyon safely this time around with only a single roll.  I have never hurt myself this badly so can only surmise about how tough that was mentally to come back and run the same river that wrecked him.  Good on you, two significant accomplishments with one river trip.  Powerful moments in a special place.


  -jacob

Thursday, March 27, 2014

Diatoms


One of the best aspects of kayaking is the ability to explore places that are remote and otherwise inaccessible. I always appreciate that I am able to experience a river, stream, or waterfall that only miniscule fraction the rest of humanity will ever see. The ability to explore these areas is part of what makes kayaking so fun, but beyond that, it can also provide kayakers with a unique opportunity to help scientists better understand our world.

That’s where Adventurers and Scientists forConservation (ASC) comes in. ASC is a really cool program that teams up outdoor sports enthusiasts with researchers, allowing scientists to solicit sample collection from very remote areas. I signed up the CCC to be a part of ASC, and they teamed us up with Dr. Loren Bahls, who studies diatoms. Diatoms are unicellular aquatic microbes with cellwalls make of glass- silicon dioxide. Diatoms are ubiquitous in pretty much all water environments, and make up the main bulk of the base of the food pyramid: they are estimated to account for 40% of all plant production worldwide, and as photosynthesizers they play a significant role in the global carbon cycle. Diatoms are good water quality indicators and identifying diatoms in various waters tells us a lot about that specific habitat. Currently, it’s estimated that only 12% of the global diatom species have been named and described; of the diatoms identified in the US, most have been found in lower elevation, polluted waters. So, armed with sampling bags and paddles, the CCC headed off to Washington to try to find some new diatom species in some pristine NW kayaking runs.
First up, we headed to the Upper Upper Cispus. After getting warmed up on the put-in waterfall, we took our first sample just below the Adam’s Creek confluence.

Sampling Crew (photo by Joe Kemper)
After that we pretty much concentrated on kayaking. Lucas Glick and Michael both had great lines on Island (I had a great line on the portage around island), and at one point I was laughing out loud after landing a massive boof on one of the bigger boulder garden rapids.
Lucas Reitman blasting through the hole at the bottom of the gorge of no return
But, before we knew it, we were at the lip of Behemoth. Behemoth is definitely one of the most intimidating waterfalls I’ve run, but there’s not really another option (technically the portage is possible, but even experienced and frequent portagers like myself find it intimidating). In the end we all had good lines off the monster, although some were more stylish than others. And, while I was waiting for the boys to make it down, I took some more Diatom samples!!

Diatom Sample, shown with Behemoth for scale

Joe, showing off his EG lean

The final boulder gardens were delightful. And near the end of the run, we hiked up a side canyon and found an extra bonus waterfall (and some more diatoms)!

Michael and I hunting diatoms

Myself, being very excited about diatom collection (photo by Lucas Rietmann)
The next day the adrenal glands were shot, so we went for a mellow BZ Corner to Columbia run. We got another 4 diatom samples along this stretch.
Jacob nailing a sweeet sampling line


Chillin' in the cave, catching diatoms

Collecting samples on these kayaking runs introduced me to a new perspective. Especially in the flat water stretches, I spent more time searching the gorge walls for seeps, side-streams, and small waterfalls coming into the river. I’ve always appreciated the scenery that I get to see when I’m down in these remote gorges and canyons, but focusing on these things made me realize how much I miss when I’m just concentrating on the whitewater. I’m definitely looking forward to continuing to do some sampling, especially on some of these exploratory creeks that Jacob has lined up…

I highly recommend that any adventure-type folks check out ASC, they have projects all over the world that are looking for people to do very simple sampling or keeping records of wildlife that they see.

And now back to your regularly scheduled kayaking with a video of the UUCispus by Lucas Rietmann:


Upper Upper Cispus from Lucas Rietmann on Vimeo.

     ~Anna Herring

Friday, March 8, 2013

2012 In a Nut Shell

Things have been pretty mellow around the Into The Outside Headquarters for the last few weeks. Matt's been paddling down in Ecuador and Argentina (reports to come) and weather hasn't really be cooperating here in the PNW. The abnormally dry January and February did allow for some nice days on the Little White, but there just hasn't been enough water to bring in anything noteworthy. I did have a fun day out on Hagen last week with a rather stompy flow, but that window closed nearly as quickly as it had opened.

The lack of water has left us at Into the Outside with a proverbial paper jam. PC Load Letter, what the %$#@ does that mean? With that in mind, I began going over some of the trip reports that I started, but never got around to finishing. After searching for awhile, I decided to combined a few of the highlights from 2012 into one gift wrapped photo dump and treat you all to a casual Friday send off.

disclaimer: This is really mu personal summary of 2012. Both Jacob and Matt were able to get on some amazing rivers of their own.


The year started off in fine form:  Punch Bowl Falls, Eagle Creek, OR


Before too long, heavy rain brought the Little Klickitat up to an amazing flow. Dan Rubado demonstrates how to punch a hole at 1400cfs. 


In what would become a theme for 2012, I found myself on McCoy at a juicy level. 


The morning after at the NW Creeking Competion. Racers keeping themselves in peak physical condition with the breakfast of champions. PBR.


Given the crummy snow-pack in California, we headed South earlier than folks usually do and were rewarded with perfect flows on the Middle Feather and South Branch. Late April in Cali!


Late spring means Little White Salmon! Rubado basking below Spirit.


We managed to catch a late season Robe lap on our Northern Exposure trip in July. Brett Barton runs Catcher's Mitt while I get ready to sneak to the right.


After Robe, we decided to make for better weather and spent a day on the Cooper River in Central Washington. JD Gaffney checking out from Norm's Resort.


Somehow, we decided it would be a good idea to hike into Salmon River Canyon from the bottom up. Poor decision, next time we'll bring two cars and do the long shuttle. Alex Kilyk mid-suffer-fest.


Final Falls to the Left and Vanishing Gorge to the Right


 Late summers means it's time to head up Highway 12 into the Gifford Pinchot National Forest. Two of my favorite rivers in the world come in just as everything else is falling out: The Ohanapecosh and the Upper Upper Cispus.

A bustling secret camp on the Ohane.


A random hero dropping through triple drop on the Ohanapecosh.


Jacob with a perfect line on the Upper Upper.


Fall/Winter boating is always means cold temps and obscure rivers. John Edwards on the hike into Silver Creek near Salem, OR.


That about sums up my kayaking in 2012. I was able to get on quite a few new rivers (which is always the best part of kayaking) and kept the carnage to a minimum. 2013 is already well underway and I can't wait to get into the thick of boating season. So many rivers remain on my list and with any luck, I'll be able to knock a few off by the time 2013 comes to a close. I'm looking at you Hoffstadt...

Until next time!

Best regards,
Nate


Thursday, August 30, 2012

Upper Upper Cispus

Photo: Matt King


BETA


Stream: This is a classic PNW stream that runs during the summer.  It is mostly IV-IV+ with one mandatory class V section (Behemoth), and one optional class V rapid (island).

Starting at a campground, there is a couple hundred yards of warm up before the river bends right and over the first falls, which is off-vertical and about 10-15' tall.  If you intend on scouting, get to the left shore before the bend to scout.


                                                      Ben Mckenzie - Warm up Falls
Photo: Priscilla Macy


The next mile or so is on the hard end of class IV with the occasional mank pile or wood to watch out for.  It often looks trashy from above and below, but the lines are fun and padded if you are in the right spot.  It can be nice to follow someone who knows the situation down the first time, but can be boat scouted too.  There is one rapid near the end of this first gorge section that should be scouted.  A hard right turn leads into it quickly, with eddies on the left above the rapid. The right and middle of the river is sieved out, and at least one person has had a frightening tangle with one of the sieve's.  Ending left over a nice 4-5' boof is how the rapid is run, getting to that boof changes year to year and person to person, scout left.

John Edwards, hitting the bottom left boof.
Photo: Nate Merrill


Below here is a blind rapid that is boofed far left, where less of the water is going.  It drops about 5', a left stroke with your nose at about 10-11 o' clock works well to avoid pitons.

Close downstream is Not Island, the easier line used to be right the whole way, in 2018 it was easiest just to go far left through what used to be a powerful hole.  It's worth a scout on the left your first lap down.

Not far downstream the river opens up for a moment into a couple gravel bars and an island.  It is an option to bail on the right here if someone is not having a good day.

There is even a neat little tube through the rock to check out.


Around the corner things gorge back up and rapids build to Island.  
Mcbenzie after walking back up for lap two.


Island has a moving pool above it and a horizon line, its worth paying attention here so you eddy out in the correct spot (on the left bank of the island at normal flows).  The right side double drop is tougher even than it looks to get a good boof.  The portage is along a shallow shelf river-left.


Approaches to Island Drop from Eric Foster-Moore on Vimeo.


Downstream are more fun rapids, one that stands out is a ramp with short but vertical walls on either side.  The hydraulic at the bottom folds into the right wall, so people flip here often.  What I find works is moving center to left, nose at 10 o' clock and following through with a strong right stroke. 


The log is gone.
 Photo: Nate Merrill


A few more rapids exist before the entrance to Behemoth, noted by a short pool created by a landslide coming in from the right.  There is a lead in rapid, then an eddy on the right to scout the Rapid of No Return, which leads to a moving hallway above Behemoth.  If it's your first time, scouting from the landslide is not a bad idea.

The Rapid of No Return is a little tricky, but can be thoroughly scouted and even portaged on the right.  Below the entrance, catch an eddy on the left before the big horizon line that is Behemoth to scout.

The scout/portage route at the entrance to Behemoth.
 
 Photo: Nate Merrill


And the crux move in the Rapid of No Return.


There is more than one way to run Behemoth, and more than one hazard.  The biggest hazard is being pulled behind the falls on the left.  To avoid this, make sure you nose is not pointed left when you get airborn.  After landing, there is a ledge with a powerful hole on the right.  A strong delayed stroke about 10-15' off the right wall works.  Or if you finessed Behemoth you can run the ledge left where there is not a hole to speak of.


On line through the meat of the hole below Behemoth.
 Photo: Nate Merrill


Downstream are two long boulder gardens.  Enter the first one center, then stay right or right-ish the rest of the way until the boulder gardens ease to class II-III. 


Mathias drops in for his first time on this quintessential 1/4 mile of classic PNW boating.


 It is easy floating from below the last boulder garden to the take out bridge, one of the side canyons is worth walking up to see a neat falls.


 A couple videos 


Upper Upper Cispus August 2016 from IKNick on Vimeo.


Upper Upper Cispus from Lucas Rietmann on Vimeo.


Flows:  500-700 is best for a first time trip.  It's still in down to 400, and has been run even lower.  It can be run higher for a more class V experience.


Matt has a write up about what you can expect from the Upper Upper Cispus when the water is up.
And here is a video from Todd Wells at even higher flows.

Access:  From I-5, head East on Hwy 12 towards Morton and Randle.  Almost an hour after leaving I-5, turn right in Randle onto Hwy 131.  In 1 mile, turn left onto Cispus river road (Iv'e lazily missed that turn before). 17.6 miles later stay right, you will reach the take out bridge within half a mile.

To get to the put in, return the half mile back the way you came in and turn right onto NF-21.  Continue upstream about 5 miles to the put in bridge.


Notes:  For those with the skill, this is an exceptional run for class V R2's.  

There is free camping at the take out, and a pay site at the put in.  The free ones are smaller and sometimes filled, so it can be worth the money to get a site at the top with toilets and benches and more vacancy.


---------------------------------------------------------------------------------
Trip Report from Nate Merrill
---------------------------------------------------------------------------------


For whatever reason, the Upper Upper Cispus has eluded me for the past two years. I've actually been at the put-in sitting in my boat, and never actually descended the river. I've always felt that the run has a very polarizing effect on those who paddle it. Some folks claim that it's right there at the top of their list, while others associate the run with low water mank. And then there are the select few who have found themselves at the lip of behemoth at higher flows, who won't even make a return trip to the area. It seems that almost everyone has a strong opinion about the UUC in one light or another.

A few weeks ago, I finally got the opportunity to create my own opinion about the most polarizing run around. I shot the following photos over a two week span in mid-late august. In subsequent weekends, we had flows around 680 cfs and 550 cfs. I'd definitely recommend the higher of the two levels. In addition to cutting down on some of the mank in the upper boulder gardens, the higher flow also washed out the troublesome hole in the gorge above Behemoth. making that section far less stressful.

I'll start with the photos from the second weekend that I spent up on the upper upper.


Cruise Control scouting the 'Warm Up' Falls - This drop is a mere 150 yards from the put-in bridge. Be careful when approaching the lip, it would be easy to get swept down the gut if you get lost on the lead-in.


Looking down into the unknown


The warm up above the warm up.

Melting Pot


John finishes off one of the countless boulder gardens in the first gorge. This one required a strong move to the left and allowed for a really sweet fading boof off a big rock in the center of the river. The right side led into a nasty boulder sieve. 


Dan Rubado - The right side of Island is a tricky line. Boof early!


The bottom hole at Island - Brandon's got safety


Jacob - Island Paradise


JD - The top of Island tends to roll people onto their left edge. Be prepared and drive hard onto the boil coming of the right wall at the lip.


Scouting the gorge above Behemoth - This is about the point where everyone starts to get really concentrated and quite. The stress factor amplifies a bit as everyone begins to contemplate the massive horizon line at the bottom of the gorge.


Send out a probe


That's me, clawing my way out of the big hole directly above Behemoth. - It's best to hit this hole on the left with lots of speed!


JD in the Gorge


View from the top


View from below


After firing off Behemoth, I snapped this shot of the lower gorge. This section is one of my favorites in the entire PNW. Go right, then right again, followed by a move on the right before heading to the right... You get the idea.


The bark is worse than the bite. Although this hole looks terrifying, as long as you're in control and paddling hard, you'll make it through just fine. JD demonstrates.


Behemoth is a fun drop, but it is consequential! There is a nasty pocket on river left that several friends of mine have wound up in. Both folks required vertical extractions up the wall.


The following photos were taken on the first weekend spent on the UUC when flows were slightly higher. I apologize for the low photo quality. I was having a bad camera day.


Alex Kilyk on a cold summer day. Temps were in the 60's and water coming down was silty run off.


Dan and Chris Menges scouting Island


Alex fires off the left line at Island


This pinch drop should be approached with caution. As you can see, there is a log in the run out that is pretty nasty on river right.


Shortly before the river drops off the face. Issac, Dan, and Chris.


Contemplating life in the eddy above the big one.


First in flight


Issac gets his river karma back in balance.


And I'll leave you with this beauty! Issac Priestly likes his beer with a little extra sediment.