

We have found these to have been pretty helpful for hiking into runs with a nice trail, or more convenient, a gravel or dirt road. Having used these on a number of trips over the last couple years we have found them to not only function well, but hold up to abuse better than expected. Given their usefulness and inquiries into how they are built, I have decided to do a tutorial.
The concept was first brought to my attention by Anna Herring, while her prototype didn't hold up to abuse, it was basically the same design we use now with a couple small changes courtesy of Emile Elliott.

Our first use for the new design was a seven mile hike into Thomas Creek, so we were putting some faith in their ability to hold up.
After another trip where Ben used a similar but different style that did not work (and the subsequent anguish is seen by the boater in red on that video) we settled in on the version Emile had come up with. We did a couple more trips with them without mishap, and become confident they would hold up in the long run. Not to mention we were very pleased with how much easier they made hiking.
So when do I decide to use the wheels? When the hike is over two miles and the path is conducive to the use of the wheels. In that setting I have been glad I used the wheels every time.
So that's the back story, here is the tutorial.
--------------------------------------------------------------------------------------
Material Needed (images at bottom of page)
- Two lawnmower wheels. They have 6" or 7" diameters usually. Both sizes fit in the back of a Nomad. Obviously 7" gives more clearance so we usually go with that.
- 19" hollow aluminum tubing that fits inside the lawnmower wheels, this will serve as an axle.
- 4 metal hitch pins
- Metal Sleeve about 14" long (we have used copper but its users choice, the diameter will need to be such that it slides over the aluminum tubing with little excess diameter).
- Paracord, about 10'
- Duct tape
- Total cost of these materials has not exceeded $25 for me
- Drill and bit capable of drilling through aluminum (Iv'e used cobalt but probably any bit will due)
- Hack-saw for cutting the metal to size
Step 1) Cut the aluminum axle to size. I have used a 19" piece for my Nomads and Mambas.
TIP: Too long and the tubing begins to sag in the middle, too short and the wheels rub the outside of the boat when in use.

Step 2) Drill a hole all the way through and just inside the end of the aluminum axle for the hitch pin.

Step 3) After inserting one of the pins into the hole you created, slide one of the lawn mower wheels on from the opposite side so that it is resting against the pin.
Step 4) Drill another hole just inside the wheel. Then insert the next pin.
TIP: give the wheel a touch of wiggle room and don't drill immediately against the wheel or it may bind. Also don't drill too far away, about 1 or 2 cm is enough.

Step 5) Repeat steps 2-4 on the other side of the tubing.
Step 6) Remove the pins and wheel from one side of the axle. Cut the metal sleeve to size and slide over the aluminum tubing. Then replace wheels and pins.
TIP: The length will depend on where you drilled the holes, you won't want the sleeve flush with the pins.

Step 7) Cut two 3' lengths from your paracord (or whatever you have handy) and tie to the aluminum axle between the inner pins and the metal sleeve.
TIP: At this point anything sticking in a odd direction or that feels a little off I will use the duct tape to put in its desired place. I find the pins and paracord sometimes need attention.

--------------------------------------------------------------------------------------
At this point the wheels are complete, the next section is how to attach them to your boat.
--------------------------------------------------------------------------------------
Additional supplies needed
- Three cam straps (Two 6', and one 4' is ideal)
- 1 kayak paddle (This system is not as good for hand paddlers)
- PFD with rescue harness (optional)
Step 1) Use the paracord to attach the wheels to your boat using the rear grab handle.
TIP: Tie a knot such that you will be able to take it off without cutting. Try to get it very tight and make sure the wheels are centered or your kayak will be lopsided during the hike.

Step 2) Take two of the camstraps and attach them to the handles just behind your seat, as well as to the wheel axle. 6' straps seem to be about the perfect size. Cinch the system tight.
TIP: Have them run inside the paracord or they are liable to be rubbed and damaged by the wheels.
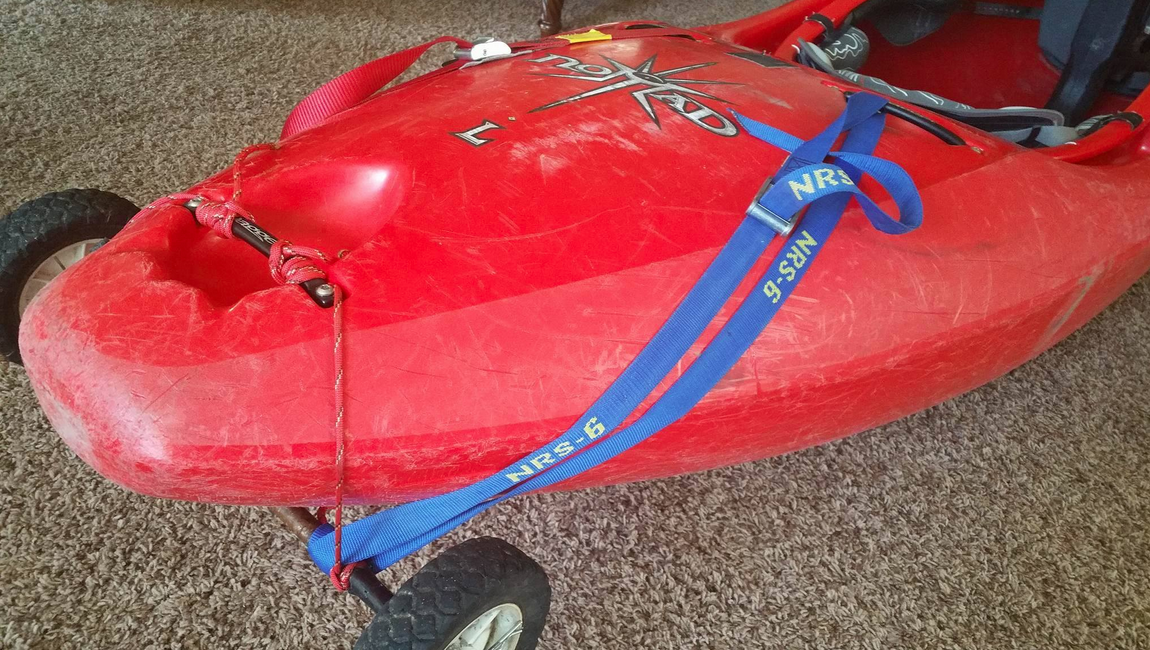
Step 3) Lay your paddle down and use more paracord to attach it to the front grab handle like shown in the image below.
TIP: Double knot it. This is the weakest part of the system. I find I'd rather tie it too tight and cut the paracord at the put-in than tie it loose and have it come undone every 15 minutes.

Step 4) Use the third cam-strap to attach the other side of your paddle to the kayaks center pillar.
TIP: Don't be TOO gentle, but also don't damage your paddle.

Step 5) Make sure everything is on their tight, then lift the boat, slide the paddle through your rescue harness if you like and cruise on up to the put in.
TIP: Wrap the cow-tail a couple times around the shaft if it's hanging too low.


Step 6) After reaching the put in, slide the device behind your seat. If space behind your seat is in short supply, you can remove the outer hitch pins and slide the wheels off.
TIP: I use the paracord to tie the wheels to one of the attachment loops in the back of my boat to keep from loosing them in the event of a swim. Cam straps I put in a dry bag.

This may seem like a lot of steps, but (A) so is setting up a back pack system. And (B), you will have no regrets three miles in when everyone else is crippled and you are actually feeling pretty good about this hike for once. Once you have the process down the set up takes under 5 minutes.

-------------------------------------------------------------------------------------------------------------
Images of material needed
Lawnmower wheels.

Hollow aluminum tubing

4 hitch pins

Metal Sleeve
This one was an old broom handle.

Paracord
Or prusik, or whatever thin rope/string you have lying around.

Duct tape

Tools Needed
Drill

Drill and bit capable of drilling through aluminum
Cobalt works, you can probably use whatever you have lying around though.

Hack-saw for cutting the metal to size

-jacob
No comments:
Post a Comment